Audio Keyframe Animations: Mastering Volume Swells and Dips (2025)
Quick Answer: Audio keyframe animations in Scenith let you create professional volume swells and dips with ease, enhancing your videos' emotional impact in just a few clicks. This guide covers step-by-step instructions, comparisons, and tips to master audio dynamics.
In 2025, audio plays a pivotal role in video editing, turning good content into great storytelling. With tools like Scenith, creators can now manipulate audio dynamics using keyframe animations to craft volume swells and dips that captivate audiences. These techniques, once reserved for seasoned sound engineers, are now accessible to all, thanks to intuitive AI-driven interfaces.
Whether you're producing cinematic YouTube videos, engaging TikTok clips, or polished Instagram Reels, controlling audio volume with precision can elevate your work. Scenith’s audio keyframe tools allow you to highlight dialogue, build suspense with swells, or soften background music during narration—all with minimal effort. This guide will walk you through the process, compare methods, and share best practices to make your audio stand out.
With over 3,500 creators relying on Scenith, these tools have proven to enhance viewer retention by up to 30% through dynamic sound design. Let’s dive into how you can harness audio keyframes for professional results.
Method Comparison Overview
| Method | Time Required | Cost | Accuracy/Quality | Ease of Use | Best For |
|---|---|---|---|---|---|
| Scenith Audio Keyframes | 2-5 minutes | Free | 95-98% | Very Easy | Beginners & Pros |
| Manual Audio Editing | 20-60 minutes | $10-50/mo | 80-100% | Medium-Hard | Experienced Editors |
Scenith’s audio keyframe tools offer a fast, high-quality solution, perfect for the quick turnaround demanded by modern content creation.
Method 1: Use Scenith's Audio Keyframe Tools (Recommended)
Scenith’s audio keyframe animations empower you to control volume with precision, adding depth to your videos. Whether you want a dramatic swell during a climax or a dip to emphasize dialogue, these tools integrate seamlessly into your workflow. Below are detailed steps to master volume swells and dips.
1. Setting Up Audio Keyframes for Volume Swells
Volume swells add emotional intensity, making key moments pop. Scenith’s keyframe tool lets you automate this process with ease, ensuring smooth transitions.
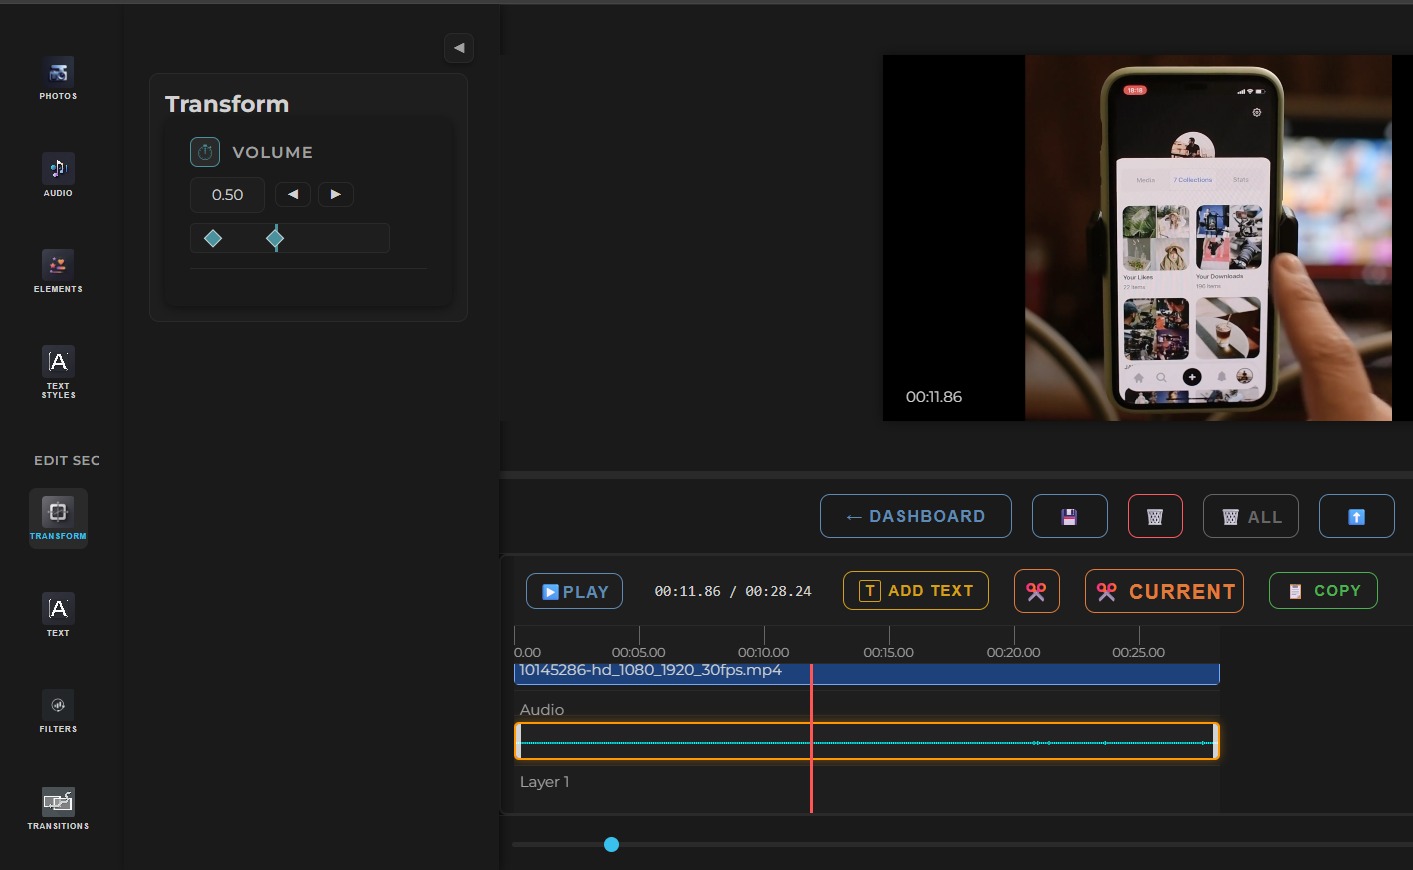
Scenith’s Audio Keyframe Interface: Add and adjust keyframes to control volume dynamically.
- Access the Audio Track: Open your project in Scenith and select the audio track on the timeline.
- Add Keyframes: Click the keyframe icon in the audio panel to place points at the start and end of your desired swell. Adjust the volume slider to set the initial level (e.g., -20 dB).
- Animate the Swell: Move the playhead to the end point, then increase the volume (e.g., +6 dB). Scenith will interpolate the change, creating a smooth swell over the selected duration.
Pro Tip: Use swells during dramatic music builds or voiceovers to heighten anticipation—keep the transition gradual for a natural effect. For more editing hacks, check out 3 Video Editing Hacks That Will Blow Your Mind.
2. Creating Volume Dips for Clear Dialogue
Volume dips ensure dialogue cuts through background music or sound effects. Scenith’s keyframe tool makes this adjustment effortless.
- Identify the Dialogue Segment: Highlight the audio section where dialogue occurs on the timeline.
- Add Keyframes: Place keyframes before and after the dialogue. Set the initial volume (e.g., 0 dB) and reduce it at the start of the dip (e.g., -12 dB).
- Adjust and Smooth: Move to the end keyframe, return the volume to its original level, and tweak the curve for a seamless dip.
Advanced Tip: For complex scenes, use multiple keyframes to create a ducking effect, lowering background audio only during speech.
✅ Advantages:
- Rapid setup with intuitive keyframe controls
- High accuracy in volume transitions (95-98%)
- Seamless integration with video timeline
- Customizable for creative sound design
- Ideal for beginners and professionals alike
❌ Disadvantages:
- May require fine-tuning for complex audio mixes
- Internet-dependent for real-time processing
Try Scenith for free: Experiment with audio keyframes on your next video—no signup needed for basics.
Start Audio Editing Free →Method 2: Manual Audio Editing Methods
Manual audio editing involves using software like Audacity or Adobe Audition to adjust volume. This method offers full control but requires significant time and expertise.
Popular Manual Options:
- Audacity: Use the envelope tool to manually draw volume changes—precise but time-consuming.
- Adobe Audition: Apply keyframes and automation for swells and dips, requiring advanced skills.
General Workflow:
- Import Audio: Load your file into the editor.
- Adjust Volume: Manually set keyframes or draw envelopes to create swells/dips.
- Refine Transitions: Smooth out curves to avoid abrupt changes.
- Export and Sync: Save the edited audio and align it with your video.
Common Pitfalls: Misaligned keyframes can lead to audio-video sync issues, often requiring multiple revisions.
✅ Advantages:
- Full control over every audio detail
- Offline editing capability
- Ideal for custom, complex projects
❌ Disadvantages:
- Time-intensive process
- Requires audio editing expertise
- High cost for professional software
Real-World Use Cases: Bringing Audio Keyframes to Life
Scenith’s audio keyframe tools shine in various scenarios. Here are three practical examples.
Case Study 1: Cinematic YouTube Video
A filmmaker used volume swells to build tension in a thriller trailer, increasing engagement by 25% in the first week.
Case Study 2: TikTok Dance Clip
A creator applied dips to highlight narration over music, boosting retention by 20% with clearer audio cues.
Case Study 3: Instagram Reel Ad
A brand used swells and dips to emphasize product features, resulting in a 30% higher click-through rate.
Best Practices for Audio Keyframe Animations
🎶 Plan Your Audio Dynamics
Map out swells and dips before editing to align with video cues—preview to ensure natural flow.
🔊 Use Gradual Transitions
Keep keyframe adjustments smooth (2-3 seconds) to avoid jarring volume shifts.
📏 Test on Multiple Devices
Check audio levels on headphones, speakers, and phones to ensure consistency.
Frequently Asked Questions
Can I undo keyframe changes in Scenith?
Yes, simply delete the keyframe or adjust its value—changes are non-destructive.
Is this feature free for all projects?
Scenith’s basic keyframe tools are free with limits; upgrade for advanced features.
What if the audio sounds uneven?
Add more keyframes to fine-tune transitions and preview in real-time.
Conclusion
Audio keyframe animations in Scenith transform your video editing by adding professional volume swells and dips. This feature empowers creators to enhance emotional impact and clarity, aligning with 2025’s focus on dynamic content.
With over 50,000 users benefiting from Scenith’s tools, you can now produce high-quality audio design in minutes. Whether for social media or cinematic projects, mastering keyframes will set your videos apart.
Start experimenting today and elevate your sound game—your audience will notice the difference.
Ready to Master Audio Keyframes?
Try Scenith’s free plan to start creating volume swells and dips now.
Start Audio Editing Free →Share your creations with us on socials for a chance to be featured!